Translate

Thursday, May 22, 2014

Cup of Coffee


Is it the coffee or is it where you have it or is it who you share a cup with? All are considerations for a good cup of coffee. My suspicion is a good cup of coffee is a combination of all three. Now we have all had that cup of “coffee water” that is just barely a notch above water itself, and it probably still sufficed for that early morning pick me up. However that cup of flavor that is just right is the one that keeps us going back for more. Now on the other hand there are those places that stick in your mind as memorable. Still the last, but not least, is who you may have a cup of coffee with and that too keeps you coming back for more.


As an example of the first, Linda (my wife) and I were at Ardovino’s Desert Crossing, a local restaurant, several years ago and had the most wonderful cup of coffee. The setting was and always is very nice, but the coffee was extraordinarily good. It was a blend of Hawaiian Rain Forest. Magnificent!


An example of the 2nd and 3rd was many years ago in San Antonio, Texas. Linda and I were meeting my brother Max and his wife Jeannette for a weekend…..it may have even been a Thanksgiving family gathering. We were staying in a hotel on the River Walk and I made plans with Max the night before to meet him down on the river at a restaurant for a cup of coffee (he doesn’t even drink coffee) and read the newspaper. I remember nothing about the caliber of coffee or the restaurant. But being there on the River Walk and sharing that quiet time on the river with my brother made a lasting memory.


I have been told many times when making coffee on


a campfire at the back of my chuck wagon “Now that has got to be the best tasting coffee I have ever had.” True probably at the moment, but it also was probably not the best coffee ever, instead it was the ambience of the campfire and the chuck wagon that made the coffee taste so good. I will even go so far as to say the people making those praises of my coffee were most likely tasting some pretty good coffee.


A recent memory of “a good cup of coffee” occurred out in Ft. Thomas, Arizona at a Chuck Wagon Hoorah put on for a bunch of chuck wagon connoisseurs. It was an outstanding morning with Rex Wailes, Dave McDowell, Eddie Sandoval, Steve Woods and I sitting around a little fire out by Rex’s teepee. Rex and Dave had been up for quite some time when I joined them at the fire around 5:30 am. The others joined the campfire coffee brigade shortly after. That particular morning Rex and Dave were probably on their second to fourth cup of coffee. Their line of chat had already taken on a life by itself talking about the enjoyment of the morning and the things the desert has to offer, like the sound of the distant coyote or the cooing of the dove or even the feeling you get when you know you are in the Land of the Apache. Was it the coffee that I remember so well, no….but the times and the people there that we shared coffee with. It was a peaceful time with absolutely no pressure dealing with food


preparation. Some of you may not know that these gatherings are like a chuck wagon cook off without the competition and without anyone having to cook something at a specific time. Well, again the coffee wasn’t exactly special other than the fact that Rex puts his coffee grounds in a lady’s silk stocking and thus has no grounds to be concerned with when pouring coffee.


Now I have said on many occasions when serving cowboy coffee “I will guarantee there will be coffee ground in your cup of coffee.” People don’t mind or at least don’t say anything except for the owner of a big auto dealership where we were cooking breakfast and he said with a big smile, “I have told lots of folks that your coffee is the crunchiest ever.” I don’t know if he liked it or didn’t, I couldn’t tell. What I hope is that he remembered where he had the crunchiest coffee ever.


At home in El Paso my wife Linda and I make coffee every morning and enjoy our southwestern home and the offerings we have inside and outside. We are always searching for the better cup of coffee and have tried many since moving from the instant variety we used for such a long time. (Funny how we can get in a rut and just keep doing the same thing because it may be easier.) We recently tried a New Mexico Dark Roast Pinon Coffee and indeed it was dark roasted and we didn’t care for the nutty taste by itself. We ended up mixing it with some other blends and toning it down a little. Our usual cup of something a little different is a Mexican coffee which has just a bit of cinnamon in the it. The coffee is usually pretty good. We use a French press to achieve the result we like but it is the location and the person with whom you share it that makes the next morning worth getting up early to enjoy.


Just a few weeks ago I was in Bennett, Colorado for another chuck wagon gathering at Rex and Sheryl Wailes farm when we again were enjoying that wonderful aroma of coffee boiling over an open fire, the stillness of the early morning sitting by the fire visiting with friends and enjoying a cup of coffee taking in the distant beauty of the snow topped Colorado Rockies….indeed priceless!


Another time that will live in my memory for a long time will be when Steve Woods and I had set up the chuck wagon at Billy the Kid Days in Lincoln, New Mexico. It was an early morning with a light rain coming down on our wagon fly (this was back when it rained occasionally) with a nice fire going just prior to sunrise and the coffee in hand and as they say…kicked back. Ahhh, now this is what it is all about. Those times are special, and I am always up for the possibility of creating a memory around that cup of coffee. I look forward to those times. I have many, many memories that deal with enjoying a cup of coffee with loved ones and friends and have chosen just a few here to illustrate the meaning of a good cup of coffee


Now some of you might just want the recipe I use and it is very simple. First, I don’t know how much the coffee pot holds, but I stick my hand into the freshly ground coffee and get about 3 fingers of coffee and put into the cold water. I fill the pot up till it is where I can see the water in the spout. When it starts boiling I will place the pot off of the hottest part of the fire and let it do its thing for a little while and then it is ready. Maybe throw a couple of sticks of cinnamon in the pot. Maybe, but what does it matter? If the coffee isn’t that good then maybe the location and the friends or your significant other will make up the difference for a less than perfect cup of coffee.


See you round the campfire. I’ll have the coffee ready.

Tuesday, April 29, 2014

Get Your Hands...and Feet...Dirty. Build Your Own Horno!

The year is now 2010.  It has been a while now, about four years, since we have been able to cook bread or turkey or anything outside in an horno.  It was our trip up to New Mexico recently to visit a new restaurant in La Union that gave us inspiration.  We talked about rebuilding the horno and writing about the new construction, so here I am putting together my ideas and a few pictures of what I am going to do to document the process..

My first undertaking will be to build a roof over where the horno will stand so we will not have the weather to contend with on this horno.  I can make it look like it is supposed to by coating the outside with mud plaster.  A young man came by the house a few months ago and asked if we had any work for him, and as it turned out he said he could do cinder block work.  What we have in the back yard is an area that is a grape arbor, and it has stucco covered cinder block pillars.  I wanted the pillars for the roof of the horno to match.  So I asked the man to duplicate the pillars and, of course, he said, “Yes, not a problem; he could do that with ease.”  I went to Lowe’s and got all the necessary building materials and brought them to Rudolfo to do his masterful work. What I didn’t do was stay with him to supervise that he was as masterful as he said.  When the job was complete (after several more trips to Lowe’s) the pillars looked great.  I paid the man and he went on his way. I went out the next day and was leaning on one of the pillars to pick something up off the ground and the pillar moved.  I myself was moved by the event and began to investigate what had happened.  It turns out that the “master cementero” had put no cement footing for the ten high stacks of cinder blocks.  He only put a little as a base to set the first block.  

This story is long so basically I will cut to the chase and tell you that I had to retrofit what he had done and dig around the base and pour a footing to give a bit for stability to the pillars.  My “fix” seems to have worked.  I will further strengthen the pillars with adobe which I will explain later.  With two by six joists sitting on pillars supporting an adobe colored tin roof, I can begin on the adobe work.  

I located Antonio De La O in Anthony, New Mexico whom I had purchased adobe from years ago, to do the kiva fireplace and banco in our BBQ courtyard as well as the first horno.  I estimated the job would take approximately 200 adobes, allowing about 50 for the horno and another 150 for the bench that surrounds it.  

SeƱor De La O is 80+ years old and still supervises the adobe making process and uses a machine he invented and built himself.  It is a wonderful contraption with a V8 engine and a couple of other smaller lawn mower engines to work various hydraulic systems.  Quite unique!  The process he uses is to combine 30% clay with 70% local sandy soil and adds to that a quantity of straw.  

I now have the adobe stacked at the horno site and am ready to begin the process.  I have removed all of the old “melted” adobe and leveled the base.  The next step will be to get a good foundation of adobe mud which will become the floor of the horno.  Layout of the adobe in a circle will begin the process and once the first course of adobe is in the proper place, each block will be fitted and mudded in and then move to the next one.  I will use that method or mark a line to follow and mud the whole bottom course and lay it all at one time.   

I began by laying a flat (the last horno, I layed the block on edge) course of adobe block in a line from where the horno opening will be to the back edge of the round foundation structure which is made of rock, dirt, adobe and plaster,.  Then I’ll follow with a course on both sides of the center course and so on until the area is covered with adobe.  I might add here that the foundation is covered up on the sides with plaster so that when and if it ever rains the bottom will not deteriorate with the water since I am building on flat ground.  

The first course is put down flat on a bed of mud which will give the horno the thickness of one adobe block. The starting point is one side of the opening and going around the foundation area and back to the opening, leaving the width of the opening which I left at approximately 15 inches by 18 inches.  As the next course is set about one inch offset toward the inside thus making each course come together toward the top forming a dome.  After reaching several bricks high (this depends on the height you want to make the horno) and getting closer in the middle, I laid several rebar across before finishing the top.  I also left a vent hole toward the back and at the top.  To close the vent when necessary I used the same steel ball that I used on the first horno. As for the door, I decided to make it a rectangle, thus necessitating a length of angle iron across the top of the opening incorporated into the course of block that marked the height I wanted for the doorway, which is approximately 14 inches.

When the horno was completely enclosed I then mudded up the irregularities in the adobe block and mud plastered the complete surface getting it as smooth as possible. I used a hatchet to square up the opening for the door.  I made the door using short pieces of 2x4 to make the frame and covered both the inside and the outside with 3/8” plywood.

No horno is complete without a good peel, scuffle, and a rooker.  I had some 1x6” pine I used to make the peel which is about 4’ long. The peel is what you use to add and remove what it is you are cooking.  The scuffle was made using an old broken shovel handle and adding an eye hook on the end with a swivel to which can be attached an old towel for cleaning out the horno.  The scuffle is what you use to clean the bottom of the oven before adding your bread.  The rooker was made from an old metal weed whacker that didn’t work well on the weeds, so I took one of the braces off and bent it out so that with the short 30” handle it makes a nice tool to rake out the coals and ashes after burning the wood.  

I used a slab of shale as a door on the last horno and decided it would make a good table since I no longer was going to use it for a door.  I dug a hole and set up a two foot long piece of mesquite wood vertically and set the shale on it, thus making a rock preparation table.  

I decided to use two different recipes for the first bread to be cooked in the horno utilizing pecan wood that was close by for the first firing.  It was a pretty good bunch of wood, and I added several pieces over a period of about 30-45 minutes, then let it burn down to coals and just about to ashes.  I raked out the residue and scuffled the inside.  Then I put the bread in the oven using the peel.  Everything went well with the exception of one thing:  I forgot to close up the vent hole.  Much of the precious heat escaped in the 20 minutes before I noticed and covered the vent.  The bread cooked, but it did not reach the beautiful golden brown that I was expecting.  The taste was good and the bread was done in, I think it was about 45-60 minutes.  I am sure the bread would have baked much quicker had I covered the vent earlier, even before all the coals were taken out.  It will take a couple of times before I have the timing and the amount of wood correct.  Also, you can use cornmeal to test the heat of the oven.  When you throw in a  bit of cornmeal and it lightly browns fairly quickly you are at about the right temperature.

Just yesterday, I cooked another two loaves of oat beer bread in the oven, all the while checking the temperature.  Just before I removed the wood, the temperature was about 875 degrees according to the digital thermometer I was using.  When I got the floor of the horno cleaned out the temperature had dropped to a little over 400 degrees.  Something seemed wrong for the heat to drop that quickly.  Maybe, just maybe I didn’t burn the wood long enough to sufficiently heat the adobe.  The bottom line is that I still was not completely satisfied with the result.  The bread was cooked in about an hour, but still not the golden brown I was expecting.  Next time I will use a Native American recipe and cook without using a loaf pan and see if the results change.

Ultimately, the time it takes to heat the oven depends upon the size of the oven.  I will burn mine down for about 3-4 hours then raking out the coals.  Checking the temperature you, you can use flour or cornmeal.  If you sprinkle a little from the center toward the front and see how long it takes to smoke or burn.  You are looking for a temperature that will turn the “sprinkle” brown in about a minute.  Just like cooking in any oven, whether it is in your BBQ or in your oven inside the house, you always have to spend some time and “learn” how it cooks best…..

I still have some left over clay that needs mixing for the smooth finish coat of adobe before it will really look good.  And so goes the horno project.


Wayne Calk

March 2010

Thursday, March 6, 2014

Get Your Hands...and Feet...Dirty. Build Your Own Horno!

El Camino Real Historic Trail Site--Truth or Consequences, New Mexico

This blog is one of those that I mentioned about taking liberties with "Chuck Wagon Musings", in that it has to do with cooking and the period of time that we were using the chuck wagons....just not wagons per sae. You will notice the Dutch oven in the opening, so...... there you have it, the connection to the chuck wagon.

What the heck is an horno you ask?  It is an outdoor oven built from Mother Nature’s materials....clay!  It is also a cool looking structure you can find all over the southwestern part of the United States.  They can be spotted around Native American establishments or communities.  It is basically an oven and can be used to cook a variety of things ranging from bread to meat, and of course a more modern dish like pizza.  Just about anything can be cooked in an horno that you ordinarily cook in a conventional oven. The fact that you use your hands--and feet to mold the clay into shape for construction of the oven is also rewarding.  I might add a warning here that you should be prepared to spend some time digging the mud out from underneath your fingers and toes because there will certainly be a lot lodged under them.  Or maybe it would just be easier to get a manicure and pedicure.
Saydbea photo from Flickr

I think it is particularly rewarding to be able to construct anything that serves a useful purpose, and I find this adobe structure especially fun when company comes over. Several years ago my wife Linda and I decided we wanted an horno (earthen oven) in our back yard, so I started looking for written material on the subject.  We found that Adobe Architecture by Myrtle & Wilfred Stedman was mostly about adobe home construction; however the last few pages were dedicated to The Indian Oven.  That part was a running dialogue by Eva and John (pueblo Indians) with diagrams by Myrtle Stedman on how to construct an oven.    The original article (1969) was the first of its kind, and this Adobe Architecture printing was in 1978.

Having read this article and anything else I could find that gave me information about adobe, I decided to embark on my first horno.  I called my friend Skip Clark who had done extensive work in refurbishing the Socorro Mission in Socorro, Texas located just a few miles from our home as well as the old jail in San Elizario, Texas.   I enlisted his help, promising him Indian bread and a cold Tecate beer with fresh limes as his pay.  He readily accepted and we started on the project.  After locating the business of SeƱor De La O, an “adobero” in Anthony, New Mexico,  we took my old trailer, made a couple of trips back and forth on the interstate, and brought back enough adobe bricks for the oven.  I made a couple of trips because I was also making a banco (bench) and a kiva fireplace in another part of the yard.  

A lot has been written about the proper orientation of the horno to make best use of the prevailing winds and such.  For me, the location was simple because I had just one place that it could be located, so I didn’t think too long about details, like the direction of prevailing wind.  Some printed material more recently published such as Build Your Own Earth Oven, by Kiko Denze offer specifics such as which direction to face the door of the oven and the types and composition of the adobe.   He also discusses other excellent information as to how one can utilize a sand mold and how to use cobb (wet mud) instead of adobe brick.  I located an area in the back yard and decided to face the opening of the oven towards the southeast, not because of any profound reason, or suggestions by noted authors, but because it faced the grape arbor and the bunkhouse and that location seemed to be the best visual location to build.  And besides, I’m probably not going to be cooking in adverse weather to begin with.

I had a design in mind with a ledge all the way around the oven that could be utilized as a seating area in case anyone wanted to visit and watch as bread was being baked in the oven.  (Pretty exciting stuff don’t you think?) This seating area was to be about five feet across, and the oven was to be ABOUT four feet in diameter.  With those two features in mind, Skip and I began laying the adobe in a circular pattern up to a height of about 16 inches.  Then we back filled with dirt and rock and firmly compacted the center portion and wet it down so it would be good and stable and hopefully not settle too much.  After letting it dry we added a flat course of adobe that would become the floor of the horno.  When the floor was completed, we filled in all the cracks to make a very smooth surface, letting it dry completely before adding another thin layer. 


At this point we were undecided as to whether we should lay the adobe flat to make the walls the width of the adobe or to lay the adobe on the edge and make the horno the thickness of the bricks.  We decided to lay them on the edge because it would take fewer bricks using this method.  The trick in using this method was the adobe had to be leaning to the inside and their position had to set with wet mud. To achieve this we leaned one brick against one placed perpendicular to it to keep it from falling over.  We continued in this vein until the bottom course was done from one side of the door opening around to the other side of the same opening.  The next step was to fill in all of the voids at the ends of the bricks and to mud the bottom inside edge to give it a extra strength.   Then we waited until this course was dry enough to support the weight of the next course and followed the same method of laying a course of wet mud, then setting the bricks in a leaning fashion which is already at a pretty steep angle because the dome has to be formed with a third course of adobe.  The last part was the actual key that becomes the uppermost part of the dome or ceiling.  It is sort of tricky here and all the voids must be filled to give it the necessary strength.  If you lean on it the wrong way the dome will collapse.  

It is important that you make a smoke hole.  This can be done in many ways. You just have to keep in mind that it will need to be open when you are burning your wood and closed once you put bread into the oven and seal the door.  I had an old ball and chain that we once used in a Celtic festival.  I just made a hole and filled in around the ball up to the half-way point, and it was easy to set into the hole and seal off the heat.  Once everything was good and dry I added a coat of cement plaster over the outside of the oven.  This sealed up and protected the mud from water invasion.

Well, the best laid plans of mice and men don’t always go the way you want them to.  I guess somewhere along the line I failed to read that using cement was not advised.  You see, when the cement expands and contracts it tends to crack the surface.  The water invasion occurred very slowly, sort of like a sneak attack.  At first just a few cracks appeared, and then some pieces began falling off.  You get the picture.  It was still strong enough to support my son’s 6’3” friend on top of the horno.  He told me later that the top of the horno was his favorite location when they would have their “dart wars” in the back yard.  It was a few years, maybe three or four before the collapse of the horno.  It was during the summer of 2006 when we had monsoonal rains, and the water invasion was complete, and the horno was for what the bell tolled.  We went out one morning with our coffee cups in hand heading for the bunkhouse, and we saw the horno was nothing but a heap of clay. Only the bottom course of bricks was still leaning and still standing.  As is said at funerals-ashes to ashes, dust to dust, and now horno back to dust.  This horno was now history

It was before I had a camera phone when we built the first horno and I can't find any documenting pictures of it.  The base that is pictured above is all that remained of the old oven.  I did save the clay and reused it addiing straw for strength.  All of the pictures after this point are from the "new build".  What was fascinating was the mechanical wonder that Mr. De La O engineered to make his adobe making business move into the 20th century.  It truly is a wonder when you stop and think...the adobe has been made totally by hand since Biblical times so his invention is a giant step forward.  There is a separate hopper for mixing the clay 


and various stablizing agents such as portland cement, straw, animal manure, etc.  Then he backs up to the hopper and a conveyor delivers the adobe to his adobe making machine.  He or one of his sons can then drive to the drying area where the machine exudes the adobe into the molds and then deposits the adobe block out onto the ground for drying.  Quite unique....V-8 engine and other various smaller engines to deliver power to the various mechanical systems.  So the adobe is real old school with a new twist.  I like to think that my abobe oven is the horno that O built! 
 This is a multiple post for the adobe oven, so stay tuned for the next installment...

Sunday, February 16, 2014

Sourdough Sunday

Just a couple of days after Valentine's day and really enjoying this 83 degree weather in El Paso, Texas.  I have started on a rather lengthy project for a blog and realized that I needed to write something in the mean time.

This blog is about a sourdough biscuit recipe.  The recipe I have included is one I duplicated from my long time friend Glenn Benson from Del Rio, Texas.  For those who do not know, he was my 8th grade Industrial Arts (shop) Teacher .  It was one time in Del Rio that I had gone to help him out a little after some surgery when I noticed a recipe in his kitchen window. I thought it was pretty cool since one of the recipes was mine and one belonged to our friend Billy Foster.  I noticed that it was written on the back of a shooting target.  I looked around and found the same targets and replicated the recipes just as Glenn had written them.   Well anyway, one morning I asked Glenn if he wanted some biscuits and of course he responed with a "why hell yes". I think I made them a couple of times and they were sure fine.

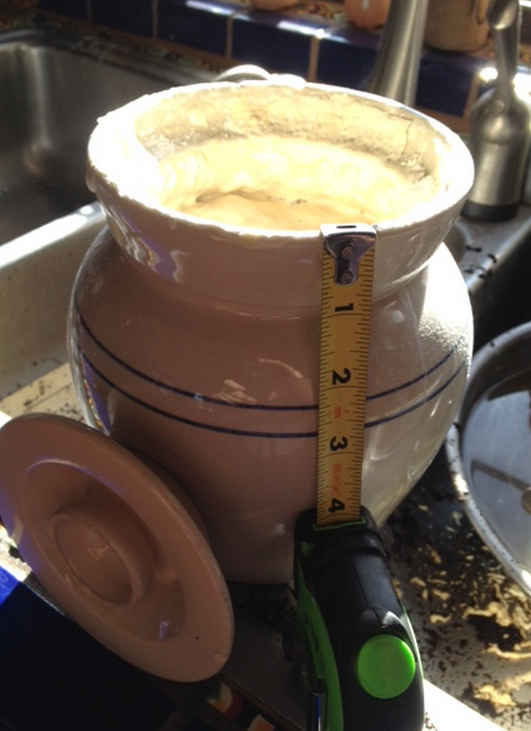
I have had several sourdough starters in the refrigerator over the years, some lasting a couple of years or so. The last starter died a couple of weeks ago for some unknown reason.  So I had to make some more.  Now those of you who know all about this sort of stuff--don't get your danderuf up--just bear with me cause there are a bunch of folks that might find this useful.  To start a new batch of sourdough starter you need to find some sort of ceramic or crock container that has a lid.  The one I use is about two quarts.  Add three cups of flour, three cups of warm water, about a tablespoon+ of sugar and about 1/2 pack of instant dry yeast.  Just set it back uncovered of a couple of three days and check on it ever now and then and stir it. You will see that it has bubbled and frothed up quite nicely.  The pan of biscuits I made after the dough had been on the kitchen counter for about three days.  I think the sourdough gets more potent after sitting longer.You can then cover your starter and put it  in the refrigerator until you are ready to use it again.  Just set it out on the counter the night before you plan to make something with it.

Now this morning I used nearly two cups of starter and when you take out two cups of starter you must add back the same....ie....two cups of flour and two cups of water....a little sugar and a little sprinkle of yeast.  Now here is something to know......with patience you can skip the adding of the instant yeast and the dough will begin to bubble  because it will get  the natural yeast from the air......it just takes longer.

I thought I would experiment with the cutting of the biscuits using the twist method and the straight pressure down method.  Of course you all know that if you twist the biscuit, it will not rise as tall and have a somewhat stunted rise on the side of the biscuit.  You can't tell from the picture but the twisted ones are about 1/4 shorter than the straight down cut.

You can follow the recipe or change it up according to your tastes.  I sometimes have to cook them about 15 minutes and sometimes 20 minutes plus.  Just keep an eye on them and if you want them browner.....well you know.  The thing to do to get the bottom and tops to crust real good is to put a goodly amount of oil in the bottom of a heavy pan and sop the top of the biscuit and turn it over.  They will be real pretty.  Oh, and of course if you will put some homemade pear preserves on them like your mother use to make then ...well ....they will be scrumptious.

The recipe is special and so was my friend.  If you will allow me to expound on our friendship--After taking his class I guess I retained a lot from his teachings.  I went on to study and teach Industrial Arts myself....then went in to public school administration.  I guess you could say much of this was because of Glenn.  Anyway we remained friends over the years...actually over 50 before he passed away.  So it is easy to remember someone special when there are so many things you do on a daily basis that are attributed to a friend.

Raising a sourdough biscuit..............Here's to you Glenn!!


Tuesday, February 4, 2014

Music of the Stars......us!


Back when these wild, cantankerous old mossey horned critters were roaming south Texas they had never heard a word from many humans, much less a discouraging word.  So when the trail drives started heading north these critters were pretty skittish.  To keep them somewhat comforted at night at least two cowboys rode in opposite directions around the herd singing to soothe the cattle and give them a sense of security that there was someone nearby who was not going to hurt them.  So began the era of the American cowboy and the great cattle drives, in which cattle were rounded up in Texas and herded north into Kansas, Missouri, Wyoming, South Dokota. There they met the railroad lines that would carry their cattle to the demanding markets on the East Coast.  The first trail that was widely used for these long drives was layed out by Jesse Chisholm and called the Chisholm Trail.

The first trail that was widely used for these long drives was called the Chisholm Trail. By the time the trail fell into disuse in 1882, hundreds of cowboys had driven tens of thousands of cattle up the trail, inventing and singing countless verses to Old Chisholm Trail.which  is believed to have at least 143 verses and the author is unknown.  
Cowboys at Austin, Texas cook off


Old Chisholm Trail
Words and Music Adapted by Woody Guthrie
Come along boys and listen to my tale
Tell you of my trouble on the old Chisholm Trail
Come a ki yi yippee yippee yi yippee yay 
Come a ki yi yippee yippee yay
Glenn Moreland Trio
Well, I started up the trail October twenty-third 
Started up the trail with a 2-U herd
Come a ki yi yippee yippee yi yippee yay 

Come a ki yi yippee yippee yay
Ten dollar horse and a forty dollar saddle 
I'm going cut them Texas cattle
Come a ki yi yippee yippee yi yippee yay 
Come a ki yi yippee yippee yay
Woke up one morning on the old Chisholm Trail
My rope in my hand and a cow by the tail
Come a ki yi yippee yippee yi yippee yay 
Come a ki yi yippee yippee yay
Rex Allen Jr. at Lubbock cook off (RAJ stock photo)
Cloudy in the west, looking like rain
My danged old slicker's in the wagon again
Come a ki yi yippee yippee yi yippee yay
 
Come a ki yi yippee yippee yay
Jumped in the saddle and I grabbed that horn
The best blamed cowboy ever was born
Come a ki yi yippee yippee yi yippee yay 
Come a ki yi yippee yippee yay
Don't give a damn if I never do stop
Ride just as long as an eight day flop
Come a ki yi yippee yippee yi yippee yay 
Come a ki yi yippee yippee yay
Foot in the stirrup and a hand on the horn 
The best danged cowboy ever was born
Come a ki yi yippee yippee yi yippee yay 
Come a ki yi yippee yippee yay
Stray in the herd and the boss said, "Kill it," 
Hit him in the rump with the handle of a skillet
Come a ki yi yippee yippee yi yippee yay 
Come a ki yi yippee yippee yay
Bacon and beans most every day
Soon to be eating that prairie hay

Come a ki yi yippee yippee yi yippee yay 
Courtney Kattner at Host Wagon..Ruidoso, New Mexico

Come a ki yi yippee yippee yay
Best dang horse, going on a run
Quickest shooting cowboy ever pulled a gun
Come a ki yi yippee yippee yi yippee yay 
Come a ki yi yippee yippee yay
Well, I went to the wagon to get my roll
Had had me figured nine dollars in the hole
Come a ki yi yippee yippee yi yippee yay 
Come a ki yi yippee yippee yay
Well, sell my outfit quick as I can
And I won't punch cattle for no damn man
Come a ki yi yippee yippee yi yippee yay 
Come a ki yi yippee yippee yay
Going to town to draw my money 
K R Wood at Ruisoso Cook off

Going to town to see my honey
Come a ki yi yippee yippee yi yippee yay 
Come a ki yi yippee yippee yay
Knees in the saddle and a seat in the sky
Quit my boss and say goodbye
Come a ki yi yippee yippee yi yippee yay 
Come a ki yi yippee yippee yay

Random picker in Austin
Eddy Harrison at Ft. Seldon, New Mexico
 In Ruidoso
I know that there are a number of singing cowboys out among the STARS and there are a goodly number of musicians out amony us that are STARS.....some shining brightly and others sort of have a satin finish if you know what I mean.......  Here are a few picutes that serve as testimony that there are STARS among us. Rex Allen Jr. played with several pickers in the Holiday Inn lobby after the Lubbock competition.  Of course, Glenn Moreland plays all the time and can be seen with his fiddle in multiple locations at
one time.  Anywhere you find a chuck wagon you will undoubtedly find some cowboys and cowgirls singing and playing some instruments.  Glenn Moreland has some sounds down on CD's as do a number of others. There is another fiddle player from San Angelo, Texas by the name of Dorothy Douthit that plays a mean fiddle and is also a chuck wagon cook.  She and many, many others play, sing, record and have fun....BUT I don't have their pictures.  Of course, the big event venues have big name entertainers that perform before,
during, and after the chuck wagon compettions.  If you are new to this kind of entertainment maybe you should attend one of these events---chuck wagon cook offs--that are held all over the country.  And while you are at it, drag along your musical instrument--look for the fire---'cause that is where we will be having fun, then just jump in and let's jam a while.   We may not sing the Old Chisholm Trail tune, but we have a lot of fun doing just about whatever happens to come to mind.  Now the story about the young fiddle player who
happens to be Ty Robertson from Granbury, Texas and the son of chuck wagon cooker Homer Robertson. There were a bunch of us, including my nephew Mike Carr,  sitting around the campfire in Austin the night before the cookoff and this young man comes up to the fire as says, "Do y'all mind it I sit in?".  All of us were surprised and we looked at each other and Mike says, "well absolutely, what do you want to play?".  Ty says " Twinkle Twinkle".  We all smiled and Mike says "You kick it off and we will fall in.".  So Ty does just that and so the song went....Twinkle twinkle little star..........this was a pretty cool moment in the annals of music by the campfire.
Mke Carr and Wayne Calk at Hondo Cook Off

Eddie Sandoval and Clayton Calk
Jerry Baird ...Austin, Texas
I wish I had more pictures of all the talented musicians I have seen by the fireside and beyond, but hopefully this will give you some idea of what happens when we aren't cooking.  Somewhere along the trail I hope you got to enjoy some of this Music Under the Stars by the Stars.........US!  See you on down the trail......